Essential Vim Movements
I’ve been using Vim for just over a year. A combination of the Vim emulator in VSCode and Neovim in the terminal. The former is a great way to start familiarizing yourself with the basics before you jump into the latter. In this post, I want to walk through some of the movements I use everyday to traverse files quickly.
Table Of Contents
- Up, down, left and right
- Up, down, left and right, but faster
- Jump to the beginning of a line
- Jump to the end of a line
- Jump to a specific line
- Search for text
Up, down, left and right
These are the first four movements anyone questing in Vim-land will learn. They
are executed with the h, j, k and l keys:
h- move leftj- move downk- move upl- move right
You can think of these four letters as flattened arrows, the ones you’d normally find on a keyboard.
Up, down, left and right, but faster
Getting comfortable with hjkl will take time, but eventually you’ll be looking
to traverse documents faster. You can achieve more speed in each direction using
the following keys:
w- move forward to beginning of next wordb- move backward to beginning of previous wordCtrl-u- move halfway up the screenCtrl-d- move halfway down the screen
I tend to use the keys above much more frequently, usually to locate a specific
part of the file. I'll then rely on the hjkl keys for pinpointing specific
characters.
Tip: Use the scrolloff setting
This one isn't a movement per se, but it will really improve your experience
when you start utilizing vertical movements like Ctrl-u and Ctrl-d. Without
overriding the default value of scrolloff, the minimal number of lines above
and below the cursor will be 0. This results in your cursor being potentially
locked to the first or last line of the file depending on the direction you are
heading.
It's kind of annoying.
I would suggest overriding the default value with a number you feel comfortable with:
set scrolloff=8
The configuration above will maintain, at minimum, 8 lines above or below the cursor based on your location in the file while scrolling. You can think of it as a padding of sorts.
This is an improvement, but I like to take it further:
set scrolloff=999
With the value 999, you can force the cursor to stay in the middle of the file
in most scenarios. This prevents your eyes from jumping around looking for the
cursor, as it will usually be in the middle of the screen until your reach the
beginning or end of the file.
Jump to the beginning of a line
This can be achieved in a few ways, depending on what your needs are:
^- Go to the first character in the line0- Go to the first column in the lineShift-i- Place the cursor before the first character in the line, and enterINSERTmode
^ and 0 are almost the same. Their difference occurs when the line you're
on is indented. ^ takes you to the first non-blank character in a line. 0
will always take you to the start of a line, even if there is no character
there.
Shift-i is useful when you want to navigate to the beginning of a line and
start typing immediately.
Jump to the end of a line
Similar to jumping to the beginning of a line, we can also jump to the end of a line using the following keys:
$- Go the last character in the lineShift-a- Place the cursor after the last character in the line, and enterINSERTmode
Jump to a specific line
There are a few ways to jump to a specific line, and they all involve the letter "G".
gg- Jump to the first line in a fileG- Jump to the last line in a file35G- Jump to line number 35
I use gg and G pretty heavily. They're great ways to go north and south,
especially if you know what you're looking for.
The last example shows how to jump to a specific line number, in this case line 35. If you type a line number that is beyond the max line number in the file, you will just go to the last line.
Tip: Use relative numbers
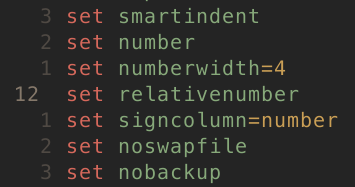
If you read my Getting Started With Vim article, you may have added the following general settings to your Vim configuration:
" add line numbers
set number
" add width to line numbers
set numberwidth=4
These are must haves in my opinion, but if you are going to leverage line numbers while navigating files in Vim, you may want to consider adding a new setting:
set relativenumber
The relativenumber setting shows line numbers relative to the line you are
currently on. In the example below, the cursor is on line 12, and the lines
above and below are numbered 1, 2, 3 and so on.

Why do I suggest this? Using relativenumber enables even more efficiency when
traversing north and south:
3j- Jump down 3 lines8k- Jump up 8 lines
Using j and k without line numbers as a prefix will go 1 line down and up
respectively. So this should feel pretty natural once you use it a few times.
These movements are still possible without the relativenumber setting on, but
it is harder to identify how many lines up or down you want to jump.
Search for text
To search for a specific text pattern in a file, you can prefix the pattern with
a forward slash /:
/my-word- Searches the file for the text pattern "my-word"
Once you complete typing out the pattern to search for, be sure to hit ENTER.
This will jump you to the first occurrence of the pattern in the file. If there
is more than one match, you can jump between them using the following keys:
n- Jump to next occurrence of text patternShift-n- Jump to previous occurrence of text pattern
Tip: Improve search experience
Here are a few settings that can improve your search experience:
" Disable highlighting of all search results
set nohlsearch
" Only highlight first search result
set incsearch
" Default to case insensitive search
set ignorecase
" Use case sensitive search if pattern includes uppercase letter
set smartcase
Conclusion
If you made it until the end, thanks for reading! I hope this article has been useful to you. I'm still very raw with Vim, but the movements described above have served me well. If you are new to the text editor, please give these a try and stick with it! You'll be surprised at how fast you adapt. It's all muscle memory!
I will do my best to keep this document updated as I progress with Vim and learn new ways to do things. If you have any suggestions, let me know on Twitter! And as always, happy building!