Getting Started With Vim - A Practical Guide
So you want to use Vim full time do ya? It’s not going to be easy, but I believe the choice is worth it. I made the switch from VSCode to Vim a few weeks ago. I’ve been diving deep and learning a ton, and I still feel like I’ve only scratched the surface. To be honest, I don’t even feel qualified to write this post. But my recent efforts have to count for something, right?
Vim presents you with a thousand roads to wander. There is no shortage of configuration options, plugins and unfamiliar syntax, leaving newbies like us lost and paralyzed with decision fatigue. If this is how you feel, you’re not alone. But I urge you to push through.
Vim can be an incredibly powerful tool in your arsenal. When you have it tuned to your liking, it's an absolute joy to use. This post is aimed at guiding you through the difficult bits so you can get to the joyful bits as fast as possible. I will go through everything I know so far, helping you go from 0 to 1.
We will create a strong foundation that you can build on over time. One that gets out of your way and allows you to produce your best work. So grab a coffee (maybe 2) and get your mind right. We will dine in the gates of Vim this day!
Table of contents
Neovim
Instead of using good ole’ Vim, the one that comes preinstalled on your MacOS or Linux machine (sorry Windows users), we will opt to use Neovim. If you’re unfamiliar, Neovim “is not a rewrite but a continuation and extension of Vim”. There isn’t much difference between Vim and Neovim from a user’s perspective. However, Neovim is optimized out-of-the-box and has an active development team that is pushing the tool to greater heights quickly.
Installation
First, you’ll need to install Neovim on your machine. There are many ways to do this. I use MacOS and opted for Homebrew:
brew install neovim
Once the install is complete, you can test that it’s working by using the following command in your terminal:
nvim --version
init.vim
Vim uses a .vimrc file to hold your configuration settings, but Neovim is a
little different. It uses an init.vim file located at the path:
~/.config/nvim/init.vim
The ~/ represents your home directory. You might already have a ~/.config
directory, as it is common amongst other tools. Whatever your situation, you
will want to create an init.vim file at the path above.
mkdir -p ~/.config/nvim
cd ~/.config/nvim
touch init.vim
In this file, you can define general settings, plugins, color schemes, keybindings (called remaps) and more.
General settings
Now that your config file is created, let’s open it up:
nvim init.vim
The file will be empty. Let’s add some basic settings:
" enables syntax highlighting
syntax on

" Better colors
set termguicolors

" number of spaces in a <Tab>
set tabstop=4
set softtabstop=4
set expandtab

" enable autoindents
set smartindent

" number of spaces used for autoindents
set shiftwidth=4

" adds line numbers
set number

" columns used for the line number
set numberwidth=4

" highlights the matched text pattern when searching
set incsearch
set nohlsearch

" open splits intuitively
set splitbelow
set splitright

" navigate buffers without losing unsaved work
set hidden

" start scrolling when 8 lines from top or bottom
set scrolloff=8

" Save undo history
set undofile

" Enable mouse support
set mouse=a

" case insensitive search unless capital letters are used
set ignorecase
set smartcase
I’ve collected these settings from community suggestions and others' dotfiles. I
believe they are a great base without being too opinionated. Comments have been
added for each setting to give some insight as to what they do. If you want more
information on each, you can type :h <setting-name> inside Neovim to bring up
the help manual for that specific setting. For example:
:h incsearch
Will bring up the help section for the incsearch option.
If you have suggestions on other settings to include, let me know on Twitter!
Plugins
Now that we have some basic settings out of the way, let’s get to the fun part. Plugins! In Vim, plugins are scripts that operate in a global scope or per filetype. Authoring these plugins is done in Vimscript. I’ve never worked with Vimscript, but I’ve heard it’s tricky, and a barrier to entry for developers who want to build plugins or contribute to Vim’s core.
- Enable new contributors
- Remove barriers to entry
- Unblock plugin authors
- Deliver a first-class scripting alternative to Vimscript
This alternative scripting language is Lua. Neovim still supports Vimscript, but the core development team encourages plugin authors to write plugins in Lua. I’ve only been exposed to the language for a few weeks, but it is relatively simple to understand. Here are a few resources if you’d like to learn more:
You will need to use Neovim for a little bit before you can understand where your pain points are. For this reason, I’m going to keep my list of plugin recommendations short. I will only recommend plugins that I feel are “blue chips” in the Neovim community.
That being said, both Vim and Neovim make it easy to pop plugins into your configuration and try them out for an hour or two. If you like them you can stick, but you don’t have to marry anything.
vim-plug
In order to install plugins we need a plugin manager. Enter
vim-plug. There are other options that I
have my eye on (looking at you
packer.nvim), but for now we will
use vim-plug. It has 25k stars on GitHub, so I think we’re in good hands.
To install it you can
checkout the docs in the GitHub repository.
Once installed, we’ll add a few lines to our init.vim:
" ...general settings

call plug#begin('~/.config/nvim/plugged')

" plugins will go here

call plug#end()
We call plug#begin(), passing in the directory where we want to install our
plugins, and plug#end(), which signifies the end of our plugin declarations.
But we haven’t declared any…yet!
A color scheme
Most colors schemes in Neovim can be installed as a plugin. A color scheme is 100% preference, and there are a lot of really good ones. Here’s a list of some of my favorites:
Inside of plug#begin() and plug#end() , let’s declare our color scheme. I
will use Gruvbox to illustrate:
" ...general settings

call plug#begin('~/.config/nvim/plugged')

Plug 'gruvbox-community/gruvbox'

call plug#end()
The above example illustrates how to declare plugins you wish to install with
vim-plug. It is shorthand notation for:
Plug 'https://github.com/gruvbox-community/gruvbox'
You can see more examples of declaring plugins with vim-plug
here.
Once you declare your plugin in init.vim, you need to take a few more steps to
install it:
- Save your
init.vimwith:w - Source your
init.vimwith:so % - Run
:PlugInstall
The commands above need to be entered in NORMAL mode. See here for an
explanation on
Vim’s “modes”.
Step one saves your init.vim file without closing it.
Step two “sources” your init.vim.
The command is shorthand for :source CURRENT_FILEPATH.
Step three calls a global function named PlugInstall which is made available
to you by vim-plug. It will open
a vertical buffer to the left of your
init.vim. In this buffer you will be able to see a list of all the plugins
you’ve installed along with the most recent installation’s progress. Once the
plugin has finished installing, you can close the vim-plug buffer by typing
:q!.
After installing your color scheme, we’ll need to tell Neovim to use it. Inside
of your init.vim and below your plugin declarations, add the following lines
of code:
" ...general settings

call plug#begin('~/.config/nvim/plugged')

Plug 'gruvbox-community/gruvbox'

call plug#end()

" declare your color scheme
colorscheme gruvbox
" Use this for dark color schemes
set background=dark
If you aren’t using gruvbox then make sure to refer to your color scheme’s
documentation for clear instructions on how to declare it.
Save and exit with :wq. Next time you reopen Neovim you should see a crisp new
paint job!
Telescope
The first function-focused plugin on the list is Telescope, created by one of Neovim’s core team members - TJ Devries.
Side note, TJ puts out a lot of Neovim-related content on his YouTube channel and his Twitch streams. His YouTube channel in particular has been a great resource. Check him out!
Telescope is a must-have plugin in my opinion. It is a fuzzy finder built in Lua that can be configured every which way. It adds a ton of functionality to your Neovim setup. I haven’t realized its true potential so far, but for finding files and searching for text it’s amazing.
Let’s install it:
" ...general settings

call plug#begin('~/.config/nvim/plugged')

" ...plugins

" Telescope requires plenary to function
Plug 'nvim-lua/plenary.nvim'
" The main Telescope plugin
Plug 'nvim-telescope/telescope.nvim'
" An optional plugin recommended by Telescope docs
Plug 'nvim-telescope/telescope-fzf-native.nvim', {'do': 'make' }

call plug#end()
Note that we are installing more than one plugin here. Telescope requires another plugin named plenary to function. And the other plugin is a Telescope Sorter that supports fzf syntax. Telescope recommends installing it for performance improvements. We like the gains, so we’ll take the gains.
Make sure to perform these three steps to complete installation:
- Save
init.vimwith:w - Source
init.vimwith:so % - Install the plugins with
:PlugInstall.
Next we need to configure Telescope. This is a common practice amongst Vim plugins, and in my opinion the most challenging aspect of Vim. If you’re working with a Vimscript-based plugin it can be even more so. This is why I’ve tried to stick to Lua-based plugins when possible.
Telescope happens to be a Lua-based plugin, which is awesome! Since it’s the first plugin on the list, we’ll need to do some basic setup.
First, we will need to create
a new directory in ~/.config/nvim named lua:
cd ~/.config/nvim
mkdir lua
Inside of the lua directory we want to create a subdirectory to namespace our
plugin configurations. To understand why this is necessary requires explaining
how Vim handles file lookup. In short, creating a namespace subdirectory inside
the lua directory
prevents unwanted filename collisions.
I’ve opted to use my GitHub handle as the name of my subdirectory:
cd ~/.config/nvim/lua
mkdir jakewies
You can make it whatever you like. It really doesn’t matter. Once you’ve created it, you’ll want to cd into it:
cd ~/.config/nvim/lua/YOUR_NAMESPACE
YOUR_NAMESPACE is being used as a placeholder. Replace it with the name of
your namespace directory.
In your namespace directory you will create a .lua file for every plugin you
want/need to configure. Telescope is the first one:
nvim telescope.lua
A helpful Vim tip is that you can open files before they exist. If you close the
file without saving it, it won’t be created! In the example above, we open
telescope.lua in Neovim. As long as we save the file it will be created.
Our configuration for Telescope will be short and sweet:
local telescope = require('telescope')

telescope.setup {}

-- To get fzf loaded and working with telescope,
-- you need to call load_extension, somewhere after
-- the setup function.
telescope.load_extension('fzf')
The above example gives us our first taste of Lua. See? Not that intimidating! I’ve found that, at a minimum, a lot of plugins need:
require('PLUGIN_NAME').setup {}
I won’t be diving deep into Telescope configuration in this post. If you want to see some of the available setup options and other customizations, check the docs.
Make sure to save telescope.lua and exit Neovim with :wq.
Next, we need to tell our init.vim that it exists:
" ...general settings
" ...plugins

lua require('YOUR_NAMESPACE/telescope')
In my case I would put:
lua require('jakewies/telescope')
A couple of notes:
- Put this command below the
vim-plugfunctions! - You don’t need to specify the
.luafiletype
What does this do? It seems a little magical at first, and understanding
requires Vim lookup knowledge, but essentially this command will look for a
lua folder in your Vim runtime, and source the specific .lua file based on
the path. So in this example the following file will be sourced:
~/.config/nvim/lua/YOUR_NAMESPACE/telescope.lua
This is great! But we can certainly improve on it.
Instead of requiring each configuration file in our init.vim, we can just
require the namespace directory. In order for this to work, we’ll need to add a
new file to our namespace directory called init.lua:
cd ~/.config/nvim/lua/YOUR_NAMESPACE
touch init.lua
The init.lua file can be thought of as an index file, similar to index.js
for you JavaScript friends. Inside init.lua we can require all of our
configuration files:
require('YOUR_NAMESPACE/telescope')
Now, inside of our init.vim all we need to do is require the namespace:
" ...general settings
" ...plugins

lua require('YOUR_NAMESPACE')
In my case it would be:
lua require('jakewies')
From this point on, any new configuration files in lua/YOUR_NAMESPACE can be
required within lua/YOUR_NAMESPACE/init.lua and they will be sourced in your
init.vim!
Ok, back to Telescope.
Telescope exposes
a number of commands
that can be accessed using :Telescope in NORMAL mode. A quick way to see all
of the available commands is to enter :Telescope followed by a space, and then
hit <Tab>. The tab button will open an autocomplete list full of available
Telescope commands. You can navigate the list using <Tab> and <Shift-Tab> to
go backwards.
Below are a list of Telescope commands that I have found extremely useful thus far:
-
:Telescope find_files-
This command will search your current directory for filenames matching your query. It will not show hidden files by default, and it will also ignore files in
.ignorefiles like.gitignore. -
This command will also try to identify if you are in a larger project using special directories like
.git. This gives you access to subdirectories and parent directories if you have moved away from the project root.
-
-
:Telescope buffers- Search for files that have been opened in a buffer in your current Neovim instance. Really helpful when you are working on a few files at a time, and you want to “narrow your world”.
-
:Telescope live_grep- Similar to
find_files, but searches for a string match rather than a file name. Note, this command will only work if you haveripgrepinstalled.ripgrepis a command-line search utility that makes searching for text really fast. It can be installed like any other command-line tool, and Telescope will use it for itslive_grepcommand.
- Similar to
The commands above are just a few I’ve been leaning on lately, and there's many
more. Another helpful tip is to think about mapping the commands above to a
keybinding. For instance, I have the find_files command mapped to <Ctrl-p>.
You can view documentation on Telescope within Neovim using:
:h telescope
Lightline
Lightline is a status line plugin for Vim. The status line exists at the bottom of your Vim window, and exposes a few helpful pieces of information, such as the current MODE (normal, insert, visual, etc.), and what type of file you are in.
I enjoy developer tools that do a small list of things well without trying to support every use case under the sun. Lightline fits that mold. It is relatively “light” in configuration options when compared to other popular alternatives like vim-airline.
To install Lightline, let’s open up our init.vim again:
" ...general settings

call plug#begin('~/.config/nvim/plugged')

" ...plugins

" Lightline
Plug 'itchyny/lightline.vim'

call plug#end()
Remember, each time you declare a new plugin you have to take 3 steps to get it installed:
- Save your
init.vimwith:w - Source your
init.vimwith:so % - Run
:PlugInstall
We will preemptively create a configuration file for Lightline now, because shortly we will install a plugin that integrates with the status line in a unique way.
In our namespace directory, let’s create a lightline.lua file:
cd ~/.config/nvim/lua/YOUR_NAMESPACE
nvim lightline.lua
Inside the file, we’ll add a placeholder config object:
vim.g.lightline = {}
The config above looks different from that of Telescope’s. The reason for this is that Lightline is not written in Lua, and so to hook into its configuration requires using the Vim namespace within the Lua standard library:
Neovim exposes a global
vimvariable which serves as an entry point to interact with its APIs from Lua. It provides users with an extended “standard library” of functions as well as various sub-modules.
vim.g is a
meta-accessor
that lets you interact with Vim’s global variable. The config above sets a new
global variable named lightline to an empty object.
Go ahead and save your lightline.lua file before sourcing it within your
namespace directory’s init.lua file:
require('YOUR_NAMESPACE/telescope')
require('YOUR_NAMESPACE/lightline')
My init.lua currently reads:
require('jakewies/telescope')
require('jakewies/lightline')
Save init.lua with :w and source it with :so %.
One last thing we want to do is hide the Vim Mode text at the bottom left of our window. This is no longer necessary since Lightline is showing us the mode too.


In your init.vim file, append the following setting to your General Settings:
" ...general settings
set noshowmode
Excellent! That wraps up the Lightline section for now. If you want to view documentation on Lightline in the future, you can do so within Neovim using:
:h lightline
vim-fugitive
If ever there was a “blue chip” plugin in the Vim ecosystem,
vim-fugitive would probably be it:
A Git wrapper so awesome, it should be illegal.
It has taken some getting used to, but the integrations provided by
vim-fugitive are powerful. Let’s install it. You know the drill by now:
" ...general settings

call plug#begin('~/.config/nvim/plugged')

" ...plugins

" vim-fugitive
Plug 'tpope/vim-fugitive'

call plug#end()
There’s no configuration required for this plugin. Just save, source, install and you’re off to the races.
I have a very familiar workflow with Git via the command line. Trying to
re-train my brain to utilize vim-fugitive is going to take some time. You
might be in a similar boat, so let me give you some helpful tips.
:Git
This is the “crown jewel” (straight from the Docs!) of vim-fugitive. As you
may have come to recognize with these types of commands, you can use <Tab>
autocomplete to see what else it can do:
:Git <Tab>
And there is a lot you can do! In fact, it’s a little overwhelming, but if
you’re familiar with Git, then you will find vim-fugitive is pretty intuitive:
" view status of current branch
:Git status

" view available branches
:Git branch

" stash work
:Git stash

" stage changes for commit
:Git add

" commit staged changes
:Git commit

" push committed changes
:Git push
Entering :Git with no command will bring up
the fugitive-summary window.
I actually like this feature a lot. You will see a list of untracked, staged and
unstaged files along with the current branch name. Placing your cursor over
these files will let you run certain “maps” like staging/unstaging, discarding
changes, toggling inline diffs etc.
For more info on what maps are available within the fugitive-summary window,
enter:
:h fugitive-maps
vim-fugitive can integrate with Lightline to display the current working
branch. Let’s set that up. In our placeholder lightline.lua file from before,
let’s add some configuration:
vim.g.lightline = {
	active = {
		left = {
			{ 'mode', 'past' },
			{ 'gitbranch', 'filename', 'modified' }
		}
	},
	component_function = {
		gitbranch = 'fugitive#head'
	}
}
There’s a lot going on here, but know that this comes straight out of
Lightline’s README in the
Advanced Configuration
section. In short, we define a component named gitbranch and set it equal to
fugitive#head, and then add the component to the left side of the status line.
Save and source the file. If you are working in a git project (pssst.
you should!) , you will
see the branch name on the bottom left!
For more information on vim-fugitive enter the following command in Neovim:
:h fugitive
gitsigns
One thing I sorely miss from VSCode is the ability to view new, modified and
deleted lines in a git project. Neovim doesn’t support this by default, so we’ll
use gitsigns:
Super fast git decorations implemented purely in lua/teal.
Yes please.
" ...general settings

call plug#begin('~/.config/nvim/plugged')

" ...plugins

" gitsigns
Plug 'lewis6991/gitsigns.nvim'

call plug#end()
gitsigns requires nvim-lua/plenary.nvim as well. Since we’ve installed
this with Telescope (see above), we’re covered.
You know what to do - Save, source and :PlugInstall.
Gitsigns requires calling a setup function in your configuration for it to
work. Let’s create a gitsigns.lua file in our namespaced directory:
nvim ~/.config/nvim/lua/YOUR_NAMESPACE/gitsigns.lua
And inside of this file we’ll get things started:
require('gitsigns').setup {}
Passing no options will init the plugin using the default settings, which can be found here.
Now let’s add gitsigns.lua to our namespace directory’s init.lua file:
require('YOUR_NAMESPACE/telescope')
require('YOUR_NAMESPACE/lightline')
require('YOUR_NAMESPACE/gitsigns')
Mine looks like this:
require('jakewies/telescope')
require('jakewies/lightline')
require('jakewies/gitsigns')
Source this file and you’re good to go! You can see gitsigns in action by navigating to a project on your machine that is version controlled with git. Any tracked file that has been modified will display that modification with a colored pipe on the left hand side of Vim.
Although this is technically what we want, the placing of the sign is a little
off. This is because we need to tell Vim to show diagnostics signs in the number
column, rather than to the left of the number. Open up your init.vim file and
add a new set option to your general settings:
" ... general settings
set signcolumn=number
Save and source your init.vim file and view the changes. Now your signs should
be displayed in the number column, rather than to the left. To learn more about
the signcolumn option, run the following command in Neovim:
:h signcolumn
Git signs also supports a Git blame feature very similar to VSCode, and it’s a feature I desperately miss. When you are in a project that uses Git, keeping your cursor over a line for a certain period of time will cause some virtual text to display in a dim color. The text will read the name of the developer that last modified the line, the modification date and the commit message.
I love this feature, but it’s not a requirement. vim-fugitive has a
:Git blame command that solves the same use case, but I prefer the virtual
text. To enable it, simply add the following to your Git signs configuration:
require('gitsigns').setup {
	-- signs config
	current_line_blame = true,
	current_line_blame_opts = {
		virt_text_pos = 'right_align'
	}
}
And that’s it! Saving and sourcing the file will result in some inline Git blame goodness.
Language support
At this point we have some general settings applied that make Neovim easier to work with. We have some plugins installed that improve our productivity. But we still haven’t done anything about language support.
In text editors like VSCode, this isn’t a huge concern. Some languages like JavaScript and HTML are supported out of the box. Others, like Python and C++, have dedicated extensions that make your life a lot easier. These extensions provide Intellisense, code completion, formatting, linting and more.
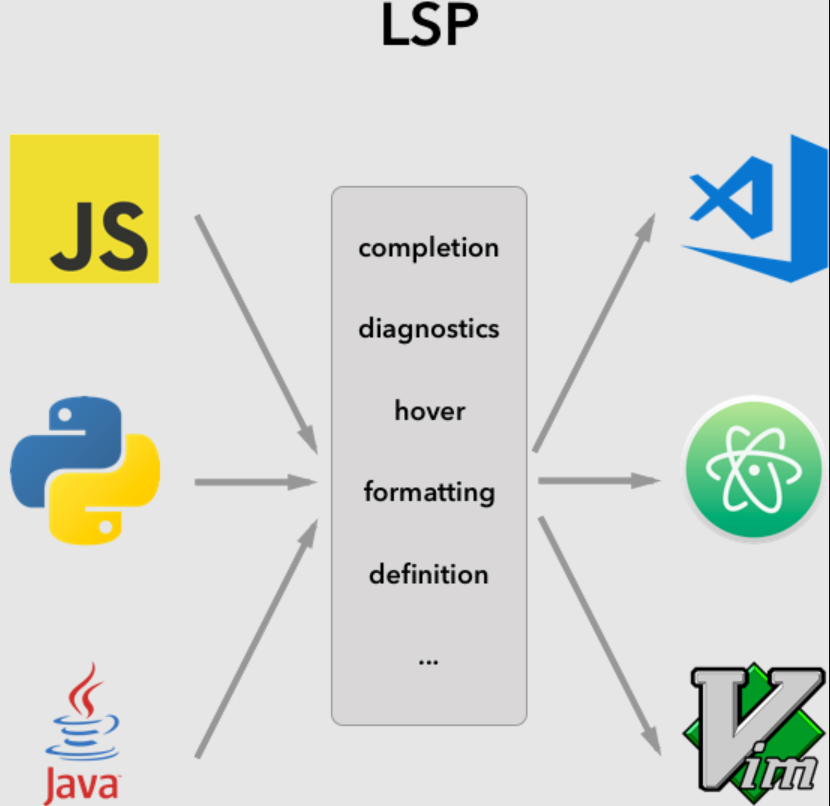
Extensions like this are possible because VSCode supports the Language Server Protocol, a Microsoft-created standard for defining communications between language tooling and text editors.
Before the Language Server Protocol (LSP), language tools and text editors had no uniform way of talking with each other. Each language tool needed a separate implementation for each editor, and each editor needed to adapt to each tool.


LSP provides a reliable standard so language tools can be built once, and editors that support LSP will be able to utilize them.

Neovim supports LSP natively as of v0.5.0, meaning we can get the same
benefits VSCode provides, albeit with a “little” configuration.
There is a second option to Neovim’s native LSP called
coc.nvim. It has been around for a
while and a lot of people use it with success. I showed up to the Neovim party
around the time that native LSP became a thing, so I never really tried coc.
I’ve heard that it is much easier to configure, but comes with significant
features that you may or may not need.
I like the idea of opting for the native solution when possible, and even though
it can be a pain to configure at the moment, the fact that the core team is
supporting LSP means that in the future things should improve. For this reason,
we’ll opt for native LSP, but feel free to check out coc if things get dicey.
In order for the rest of this section to work for you, make sure you are on
v.0.5.0 of Neovim or above.
Lspconfig
To get started with Neovim’s native LSP, we need to install a few plugins. The
first is nvim-lspconfig. Per the
README, this plugin:
Handles automatically launching and initializing language servers that are installed on your system.
We can install it the same we install any other plugin in our init.vim file:
" ...general settings

call plug#begin('~/.config/nvim/plugged')

" ...plugins

" LSP
Plug 'neovim/nvim-lspconfig'

call plug#end()
Remember to save, source and :PlugInstall!
Install a language server
The next step is installing the necessary language server(s) for your development environment. This is equivalent to installing a VSCode language extension. Neovim lists available language servers here. Find one that supports your language of choice, and install it on your machine.
For example, I work with Typescript every day, so I need to install a Typescript
language server. The list of available servers tells me that I should install
tsserver.
It can be installed via npm globally like so:
npm install -g typescript typescript-language-server
A few things to note here:
- You are not installing the language server as a Neovim plugin. You are installing the server as a global package on your computer.
- Not all language servers are installed the same.
tsservercan be installed vianpm, but others may require different installation methods. - Always refer to
the list of available language servers
to find the one you need. If installation instructions are not provided, look
at the server’s official
README.
Configure the language server
After you have successfully installed your language server(s), it’s time to tell Neovim about them. This is going to be the most challenging aspect of setting up native LSP. I am still trying to understand all the moving parts!
Let’s create a new .lua file in our namespace directory called lsp.lua:
nvim ~/.config/nvim/lua/YOUR_NAMESPACE/lsp.lua
This file will hold all of our LSP-related configuration. Inside, we need to add some boilerplate code. Note that the code we are adding here is not only documented on the lspconfig README, but it’s also the recommended configuration by Michael Lingelbach, one of Neovim’s core team members, who has worked heavily on the native LSP implementation.
I will walk through setting up this file step-by-step using tsserver is an
example.
-- lspconfig
require'lspconfig'.tsserver.setup {}
The code above is a minimal representation of how we can get Neovim’s LSP
working with tsserver. This works just fine, however we can improve on this:
-- lspconfig
local nvim_lsp = require('lspconfig')
local servers = { 'tsserver' }

for _, lsp in ipairs(servers) do
	nvim_lsp[lsp].setup {}
end
The code above is now capable of setting up any arbitrary amount of servers
defined in the servers variable. Installing more than one server? This will
effectively loop through each one and wire it up to nvim_lsp.
For example, maybe you added a few more language servers to your setup:
local servers = {'clangd', 'pyright', 'tsserver'}
The only thing that has to change in your code is the servers variable.
Everything else can stay the same!
ipairs is a lua function that returns index-value pairs. We don’t need the
index, hence the _.
Each server’s setup function is capable of accepting a special on_attach
function that runs when a server attaches to your current Neovim buffer. Think
of the current buffer as the current file you are editing in Neovim. Based on
the filetype, you can have LSP configured to do certain things.
-- lspconfig
local nvim_lsp = require('lspconfig')
local servers = { 'tsserver' }

local on_attach = function(client, bufnr)
	-- Do things when language server attaches to
	-- the current buffer
end

for _, lsp in ipairs(servers) do
	nvim_lsp[lsp].setup {
		on_attach = on_attach
	}
end
The code above creates a new on_attach function and passes it to each server
in our list of servers. But what to put in it?
The
Keybindings and completion
section of the lspconfig README illustrates adding some basic remaps that will
work across every language server. Let’s add these:
-- lspconfig
local nvim_lsp = require('lspconfig')
local servers = { 'tsserver' }

local on_attach = function(client, bufnr)
  local function buf_set_keymap(...) vim.api.nvim_buf_set_keymap(bufnr, ...) end
  local opts = { noremap=true, silent=true }

  -- our first remap
  buf_set_keymap('n', 'gD', '<cmd>lua vim.lsp.buf.declaration()<CR>', opts)
end

for _, lsp in ipairs(servers) do
    nvim_lsp[lsp].setup {
        on_attach = on_attach
    }
end
This is a lot to digest. Let’s walk through it one step at a time.
-
We define a function named
buf_set_keymapthat accepts a variable number of arguments, denoted by the….buf_set_keymapis an abstraction over thevim.api.nvim_buf_set_keymapfunction.
-
We define a table named
optsthat holds some basic options for all of our remaps.opts.noremapmeans “no recursive mapping”opts.silentmeans the command will not be echoed in the command line
-
We call
buf_set_keymapfor the first time, passing in 4 parameters.'n'tells LSP that this remap can run in NORMAL MODE'gD'is the remap itself. The letters that you will type to perform some action.'<cmd>lua vim.lsp.buf.declaration()<CR>'is the actual command you want to perform. Without the remap, you would have to write this every time.<cmd>is like typing:.<CR>denotes a carriage return, such as hittingENTER.optsis the options table we declared earlier
Our first remap is 'gD'. Typing it will be equivalent to typing
:lua vim.lsp.buf.declaration() followed by ENTER. This remap will jump to
the definition of the symbol under your cursor while in Neovim. It’s a really
helpful remap that I use all the time.
Now that you have the basics down, let’s add the rest of the remaps defined in
the lspconfig README:
-- lspconfig
local nvim_lsp = require('lspconfig')
local servers = { 'tsserver' }

local on_attach = function(client, bufnr)
    local function buf_set_keymap(...) vim.api.nvim_buf_set_keymap(bufnr, ...) end
    local opts = { noremap=true, silent=true }

    buf_set_keymap('n', 'gD', '<cmd>lua vim.lsp.buf.declaration()<CR>', opts)
    buf_set_keymap('n', 'gd', '<cmd>lua vim.lsp.buf.definition()<CR>', opts)
    buf_set_keymap('n', 'K', '<cmd>lua vim.lsp.buf.hover()<CR>', opts)
    buf_set_keymap('n', 'gi', '<cmd>lua vim.lsp.buf.implementation()<CR>', opts)
    buf_set_keymap('n', '<C-k>', '<cmd>lua vim.lsp.buf.signature_help()<CR>', opts)
    buf_set_keymap('n', '<space>wa', '<cmd>lua vim.lsp.buf.add_workspace_folder()<CR>', opts)
    buf_set_keymap('n', '<space>wr', '<cmd>lua vim.lsp.buf.remove_workspace_folder()<CR>', opts)
    buf_set_keymap('n', '<space>wl', '<cmd>lua print(vim.inspect(vim.lsp.buf.list_workspace_folders()))<CR>', opts)
    buf_set_keymap('n', '<space>D', '<cmd>lua vim.lsp.buf.type_definition()<CR>', opts)
    buf_set_keymap('n', '<space>rn', '<cmd>lua vim.lsp.buf.rename()<CR>', opts)
    buf_set_keymap('n', '<space>ca', '<cmd>lua vim.lsp.buf.code_action()<CR>', opts)
    buf_set_keymap('n', 'gr', '<cmd>lua vim.lsp.buf.references()<CR>', opts)
    buf_set_keymap('n', '<space>e', '<cmd>lua vim.lsp.diagnostic.show_line_diagnostics()<CR>', opts)
    buf_set_keymap('n', '[d', '<cmd>lua vim.lsp.diagnostic.goto_prev()<CR>', opts)
    buf_set_keymap('n', ']d', '<cmd>lua vim.lsp.diagnostic.goto_next()<CR>', opts)
    buf_set_keymap('n', '<space>q', '<cmd>lua vim.lsp.diagnostic.set_loclist()<CR>', opts)
    buf_set_keymap('n', '<space>f', '<cmd>lua vim.lsp.buf.formatting()<CR>', opts)
end

for _, lsp in ipairs(servers) do
	nvim_lsp[lsp].setup {
		on_attach = on_attach
	}
end
Now your language server(s) will be able to run these remaps whenever you
please. There’s a lot here, and there’s a good chance you won’t use them all.
But it’s helpful to have them in case you do. I like to keep my lsp.lua file
close while I work, referencing these remaps in case I want to perform some
actions. Here are a few that I like to use:
gD- see the declaration of a symbol (function, variable, etc.)K- see some info about a symbol in a hover windowgr- show a list of references to a symbol<space>e- show any issues on the current line
Once the rest of our remaps have been added to our on_attach function, let’s
save the file and require it inside of init.lua:
require('YOUR_NAMESPACE/telescope')
require('YOUR_NAMESPACE/lightline')
require('YOUR_NAMESPACE/gitsigns')
require('YOUR_NAMESPACE/lsp')
To give your remaps a test drive, make sure to save and source this file. Hop
into a project that utilizes one of your language servers and you’re all set! If
you're not sure that LSP is working in a particular file, type the command
:LspInfo.
You can read more about Neovim's built-in LSP using the command:
:h lsp
Autocompletion
Next on the list of language-related items to configure is autocompletion. Autocompletion is a huge productivity improvement for developers, and it does not come baked into Neovim. We need to install a few plugins to make it happen.
" ...general settings

call plug#begin('~/.config/nvim/plugged')

" ...plugins

" Autocompletion
Plug 'hrsh7th/nvim-cmp'
Plug 'hrsh7th/cmp-nvim-lsp'
Plug 'L3MON4D3/LuaSnip'
Plug 'saadparwaiz1/cmp_luasnip'
Plug 'onsails/lspkind-nvim'

call plug#end()
Yes we just installed 5 plugins for autocompletion. Don’t freak out. They each have their purpose:
nvim-cmp-The main plugincmp-nvim-lsp- A dependency of nvim-cmpLuaSnip- Autocomplete your snippets.cmp_luasnip- Snippet completion source. Not quite sure what it does? But it’s recommended indefaults.nvim.lspkind-nvim- Autocompletion icons
Save, source and :PlugInstall.
Now that all of these plugins are installed, let’s glue them together. But,
instead of configuring it within its own .lua file, we’ll want to colocate it
with our LSP config. You'll see why:
-- ...lspconfig

-- nvim-cmp
local cmp = require('cmp')
local lspkind = require('lspkind')
local luasnip = require('luasnip')

-- better autocompletion experience
vim.o.completeopt = 'menuone,noselect'

cmp.setup {
	-- Format the autocomplete menu
	formatting = {
		format = lspkind.cmp_format()
	},
	mapping = {
        -- Use Tab and shift-Tab to navigate autocomplete menu
        ['<Tab>'] = function(fallback)
            if cmp.visible() then
              cmp.select_next_item()
            elseif luasnip.expand_or_jumpable() then
              luasnip.expand_or_jump()
            else
              fallback()
            end
          end,
        ['<S-Tab>'] = function(fallback)
            if cmp.visible() then
              cmp.select_prev_item()
            elseif luasnip.jumpable(-1) then
              luasnip.jump(-1)
            else
              fallback()
            end
        end,
        ['<CR>'] = cmp.mapping.confirm {
            behavior = cmp.ConfirmBehavior.Replace,
            select = true,
        },
    },
    snippet = {
        expand = function(args)
            luasnip.lsp_expand(args.body)
        end
    },
    sources = {
        { name = 'nvim_lsp' },
        { name = 'luasnip' },
    },
}
A lot to take in. Let’s walk it out.
formatting.format- Formats the autocomplete menu usinglspkind, a plugin we installed earlier. This adds icons to keywords and variables to autocomplete options.mapping- Custom keybindings for better autocomplete menu navigation. Press<Tab>to navigate forward, and<Shift-Tab>to navigate backwards. Press<CR>(Enter) to confirm selection.snippet- Enables snippet autocompletion viaLuaSnipsources- Declare autocompletion sources.
After configuring the autocompletion plugins, we need to wire it all up with our language servers:
-- lspconfig
local on_attach = function(client, bufnr)
  -- ...
end

local capabilities = vim.lsp.protocol.make_client_capabilities()
capabilities = require('cmp_nvim_lsp').update_capabilities(capabilities)

local servers = { 'tsserver' }
for _, lsp in ipairs(servers) do
    nvim_lsp[lsp].setup {
        capabilities = capabilities,
        on_attach = on_attach,
    }
end

-- ...nvim-cmp
The above code adds a new property named capabilities to each language server.
All together, lsp.lua now looks like this:
-- lspconfig
local nvim_lsp = require('lspconfig')
local servers = { 'tsserver' }

local on_attach = function(client, bufnr)
    local function buf_set_keymap(...) vim.api.nvim_buf_set_keymap(bufnr, ...) end
    local opts = { noremap=true, silent=true }

    buf_set_keymap('n', 'gD', '<cmd>lua vim.lsp.buf.declaration()<CR>', opts)
    buf_set_keymap('n', 'gd', '<cmd>lua vim.lsp.buf.definition()<CR>', opts)
    buf_set_keymap('n', 'K', '<cmd>lua vim.lsp.buf.hover()<CR>', opts)
    buf_set_keymap('n', 'gi', '<cmd>lua vim.lsp.buf.implementation()<CR>', opts)
    buf_set_keymap('n', '<C-k>', '<cmd>lua vim.lsp.buf.signature_help()<CR>', opts)
    buf_set_keymap('n', '<space>wa', '<cmd>lua vim.lsp.buf.add_workspace_folder()<CR>', opts)
    buf_set_keymap('n', '<space>wr', '<cmd>lua vim.lsp.buf.remove_workspace_folder()<CR>', opts)
    buf_set_keymap('n', '<space>wl', '<cmd>lua print(vim.inspect(vim.lsp.buf.list_workspace_folders()))<CR>', opts)
    buf_set_keymap('n', '<space>D', '<cmd>lua vim.lsp.buf.type_definition()<CR>', opts)
    buf_set_keymap('n', '<space>rn', '<cmd>lua vim.lsp.buf.rename()<CR>', opts)
    buf_set_keymap('n', '<space>ca', '<cmd>lua vim.lsp.buf.code_action()<CR>', opts)
    buf_set_keymap('n', 'gr', '<cmd>lua vim.lsp.buf.references()<CR>', opts)
    buf_set_keymap('n', '<space>e', '<cmd>lua vim.lsp.diagnostic.show_line_diagnostics()<CR>', opts)
    buf_set_keymap('n', '[d', '<cmd>lua vim.lsp.diagnostic.goto_prev()<CR>', opts)
    buf_set_keymap('n', ']d', '<cmd>lua vim.lsp.diagnostic.goto_next()<CR>', opts)
    buf_set_keymap('n', '<space>q', '<cmd>lua vim.lsp.diagnostic.set_loclist()<CR>', opts)
    buf_set_keymap('n', '<space>f', '<cmd>lua vim.lsp.buf.formatting()<CR>', opts)
end

local capabilities = vim.lsp.protocol.make_client_capabilities()
capabilities = require('cmp_nvim_lsp').update_capabilities(capabilities)

local servers = { 'tsserver' }
for _, lsp in ipairs(servers) do
    nvim_lsp[lsp].setup {
        capabilities = capabilities,
        on_attach = on_attach,
    }
end

-- nvim-cmp
local cmp = require('cmp')
local lspkind = require('lspkind')
local luasnip = require('luasnip')

-- better autocompletion experience
vim.o.completeopt = 'menuone,noselect'

cmp.setup {
	-- Format the autocomplete menu
	formatting = {
		format = lspkind.cmp_format()
	},
	mapping = {
        -- Use Tab and shift-Tab to navigate autocomplete menu
        ['<Tab>'] = function(fallback)
            if cmp.visible() then
              cmp.select_next_item()
            elseif luasnip.expand_or_jumpable() then
              luasnip.expand_or_jump()
            else
              fallback()
            end
          end,
        ['<S-Tab>'] = function(fallback)
            if cmp.visible() then
              cmp.select_prev_item()
            elseif luasnip.jumpable(-1) then
              luasnip.jump(-1)
            else
              fallback()
            end
        end,
        ['<CR>'] = cmp.mapping.confirm {
            behavior = cmp.ConfirmBehavior.Replace,
            select = true,
        },
    },
    snippet = {
        expand = function(args)
            luasnip.lsp_expand(args.body)
        end
    },
    sources = {
        { name = 'nvim_lsp' },
        { name = 'luasnip' },
    },
}
Treesitter
The last plugin to improve Neovim's language support is treesitter.
We will be installing it
for improved syntax highlighting. In your init.vim, add the following to you
list of declared plugins:
" ...general settings

call plug#begin('~/.config/nvim/plugged')

" ...plugins

" Treesitter
Plug 'nvim-treesitter/nvim-treesitter', { 'do': ':TSUpdate' }

call plug#end()
Next, create a treesitter.lua file in your namespace directory:
nvim ~/.config/nvim/lua/YOUR_NAMESPACE/treesitter.lua
Inside this file we'll add the following:
local treesitter = require('nvim-treesitter.configs')

treesitter.setup {
    highlight = {
        enable = true
    }
}
Finally, update your init.lua to include treesitter.lua:
require('YOUR_NAMESPACE/telescope')
require('YOUR_NAMESPACE/lightline')
require('YOUR_NAMESPACE/gitsigns')
require('YOUR_NAMESPACE/lsp')
require('YOUR_NAMESPACE/treesitter')
And that's it! Source your init.vim and you should see an improved syntax
highlighting experience.
Remaps
The following will not be a tutorial on remaps themselves, as remaps in Vim are a topic worthy of a separate article. There are also plenty of great resources on the topic:
- Mapping Keys in Vim
- Understand Vim Mappings and Create Your Own Shortcuts!
- Basic Mapping - Learn Vimscript the Hard Way
Instead, I will quickly explain what they are and why you would want to use them, and ultimately hope to inspire you to seek out your own.
Let's begin.
Over the course of this article, we've covered many plugins that introduce their own commands:
" Telescope
:Telescope find_files
:Telescope buffers
:Telescope live_grep

" vim-fugitive
:Git
:Git add
:Git status
:Git blame

" lspconfig
:LspInfo
On top of these plugin-specific commands, Vim has its own set of commands. It can be cumbersome to type out the entire command every time you want to use it. Instead, you can "map" these commands to a pattern of keystrokes. These are remaps.
I declare my remaps inside init.vim. Here's an example of one of my favorites:
" ...general settings

" ...plugins

" remaps
nnoremap <C-p> :Telescope find_files<Cr>
The remap above is <C-p>, or CTRL+p. Each time I type this pattern, the
command :Telescope find_files<Cr> will run. <Cr> must be explicitly declared
in order for the command to be "entered", i.e - with <Enter>.
Here are a few others:
" ...general settings

" ...plugins

" remaps
let mapleader = ' '

nnoremap <leader>h :wincmd h<Cr>
nnoremap <leader>j :wincmd j<Cr>
nnoremap <leader>k :wincmd k<Cr>
nnoremap <leader>l :wincmd l<Cr>

nnoremap <C-p> :Telescope find_files<Cr>
A mapleader is a special character you can appoint to "lead" your remaps. This
both simplifies remap keystrokes and prevents unwanted remap collisions. It
defaults to \, but here I'm setting it to an empty space, ' '.
<leader>h is equivalent to typing the <Space> bar followed by the letter
h. Doing so will run the command :wincmd h<Cr>.
I believe remaps are one of those things you'll undoubtedly look for as you notice pain points in your own workflow. It can be helpful to puruse others' Vim configurations and see what they use for inspiration.
Tips and tricks
- Use relative line numbers
Your Neovim terminal supports line numbers with the following setting:
set number
When you get more advanced with your Vim movements, you'll look for ways to move vertically faster. One of the ways to do this is to explicitly type the line number you want to go to. This is easier with relative line numbers:
set number
set relativenumber
How does it work? The line your cursor is currently on will be denoted "line 0".
The rest of the lines above and below will be numbered relative to their
distance from line 0. For example, the line directly below your cursor will be
line 1. So will the line directly above. To jump to line 1 below, type the
number 1 plus the letter j. To go to line 1 above, type the number 1 plus
the letter k.
- Alias the
nvimcommand
An alias is a shortcut defined in your terminal shell’s settings that allows you to run regular commands with custom names. An example alias that many people use is:
alias gc="git checkout"
Instead of typing git checkout every time I want to check out a branch, I just
need to type gc. My terminal knows that when I enter gc, what I really mean
is git checkout.
Defining your aliases is dependent on which terminal shell you are using. There
are a number of shells that people use these days, like bash, zsh and
fish. I use zsh, but you may not be. If you don’t know what shell you are
using, you can run the following command in your terminal:
echo $SHELL
Aliases are defined in your shell’s configuration file. For bash users, that
would be .bashrc. For zsh users, .zshrc. etc. etc. Your mileage may vary.
Locate your specific file, and add the following:
alias vim ="nvim"
Now anytime you run the command vim, you will really be running the command
nvim. If you still want access to the original vim command, you can prefix
it with a \ character:
\vim
The command above will use the unaliased vim command. The more you know,
right?
- Save your Neovim configuration in Git
This is a major key! I've written a blog post on this very topic. I suggest you take a look. Your Neovim configuration is a subset of a larger group of configuration files dubbed "dotfiles". Dotfiles are the life blood of a good development environment. Make sure you keep yours portable!
- Experiment!
Programming is way more fun when you're being efficient. Neovim can get you there over time, but you have to be willing to try new things. New plugins, new remaps, etc.
- Keep an eye on the community
Neovim has an active subreddit and forum. These are great places to learn and find new plugins to experiment with.
Conclusion
Phew! If you've stuck with me to the end, I appreciate you! This was a massive article, one of the biggest I've ever written. We discussed settings, plugins, color schemes, language support, autocompletion and remaps. I hope you learned something!
If you're curious to see my configuration, you can checkout
my dotfiles on GitHub, specifically the nvim directory.
And if you're just getting started on your Vim journey, please let me know! It's
been a challenging and exciting one for me, and I'm only getting started.